I am frequently asked why I
built a boat, and particularly, why I built a Glen-L Zip. The first
part of the question is easy to answer: I love to build things and I
can’t afford to go out and buy a new boat, so a set of plans was my
preferred starting point. And why the Zip? I was initially drawn to it
because it has style and character, more than I’d ever be able to find
in any boat on the market, whether or not I could afford it. But I
didn’t have much boatbuilding experience, other than a stitch-and-glue
plywood kayak I had finished, so I was unsure if a Zip would be within
my abilities. As I searched the Web and corresponded with other novices
who had successfully built one, it quickly became clear that it was the
obvious choice.
I am a Fire Chief in a small community in Michigan, and our Village Manager is my good friend Art Atkinson. One day Art walked into my office and said he was considering building a boat for himself. He had just returned from northern Michigan where old wooden boats are almost everywhere along the shores of Lake Michigan and Lake Huron. I told him I’d been considering building a boat for myself, too. He liked the idea, and we decided we would both build wooden boats while helping each other along the way. I ordered plans for the Zip, and Art settled on an equally classic-looking runabout, the Glen-L Squirt. Both Art and I would be building our boats in our basements and so had limitations on the size of the boats we could build. The 14′ 4″ Zip was the largest boat I could build and still get it out of my walkout basement. The 10’ Squirt was small enough to be carried up the stairs from Art’s basement, and through the kitchen to get it outside.
 photographs courtesy of the author
The plans for the Zip came from Glen-L with a step-by-step
instruction manual and full-sized patterns for the transom, frames,
gussets, stem, breasthook, and knees. Builders can shorten the boat by
10 percent if they reduce the frame spacing, but Glen-L recommends
against lengthening the Zip. There is also an option to either set the
boat up as a utility skiff with an open cockpit or as a runabout with
decking surrounding two cockpits. I built my boat to the designed length
as a runabout.
photographs courtesy of the author
The plans for the Zip came from Glen-L with a step-by-step
instruction manual and full-sized patterns for the transom, frames,
gussets, stem, breasthook, and knees. Builders can shorten the boat by
10 percent if they reduce the frame spacing, but Glen-L recommends
against lengthening the Zip. There is also an option to either set the
boat up as a utility skiff with an open cockpit or as a runabout with
decking surrounding two cockpits. I built my boat to the designed length
as a runabout.
I bought rough-cut African mahogany from a local sawmill, brought it home, and milled it for the frames. The frame pieces are joined by plywood gussets at the corners. The stem is made of two layers of 3/4″ plywood, and the transom is a single thickness of 3/4″ plywood, framed and reinforced with mahogany. Mounted on a dual-beam strongback, the three completed frames, the transom, and the stem define the shape of the hull—there are no temporary forms. The keel, chines, and inwales then connect the transom, frames, and stem. The chines were the most difficult longitudinals to install. Each is a two-piece laminate, and each of those pieces required steaming to coax it into the needed bend and twist. Later it took a lot of clamps to tightly close the glue joints between the chine halvess.
The materials list specifies 1/4″ Douglas-fir exterior plywood for the hull, and while it’s an economical choice, I had a bright-finished boat in mind and so opted to use mahogany marine plywood. For the side panels, I cut two 4×8 sheets of plywood in half and joined the pieces to make a pair of 2×16 sheets, with the seams butted and ’glassed.
 The side panels came under a bit of strain when I started to wrap
them around the framework, so I applied towels and hot water to soften
them up a bit. They then bent easily and held their new shape when
dried, ready for epoxy and screws. The bottom went on in three
pieces—one full-width piece aft and two half-width pieces forward. None
required steaming to be applied to the framework. The hull, while still
upside down, got a layer of 6-oz fiberglass, a skeg, and bottom paint.
The side panels came under a bit of strain when I started to wrap
them around the framework, so I applied towels and hot water to soften
them up a bit. They then bent easily and held their new shape when
dried, ready for epoxy and screws. The bottom went on in three
pieces—one full-width piece aft and two half-width pieces forward. None
required steaming to be applied to the framework. The hull, while still
upside down, got a layer of 6-oz fiberglass, a skeg, and bottom paint.
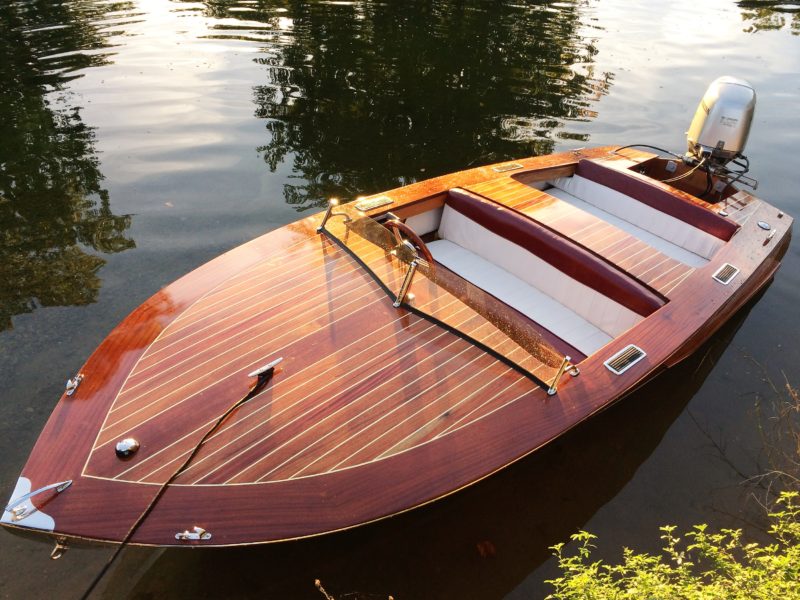
Work on the interior started after the boat was flipped upright. Floorboards were not included in the plans, but I opted to add them to provide both a more finished look and a stable platform for my passengers to stand on when entering and exiting the boat. I was also worried about feet and gear getting wet, but water never seems to accumulate in the Zip. I used ash for the floorboards because of its strength and for the contrast of color.
The plans call for a deck of mahogany or fir plywood, and while that would be sufficient for a utilitarian boat, many builders of Glen-L runabouts opt to dress the plywood up with covering boards and deck planking. It makes a striking difference. I used mahogany for all of my decking. I bookmatched the broad covering boards to create a symmetrical pattern in the wood grain, then dyed them to create contrast with the deck planks. I added some decking beyond what was detailed in the plans to reduce the open area of the motorwell and provide a tidier appearance. Rather than use white caulk to accent the deck seams, I filled them with epoxy mixed with white pigment. When covered with varnish, the bright white took on a nice, aged golden color.
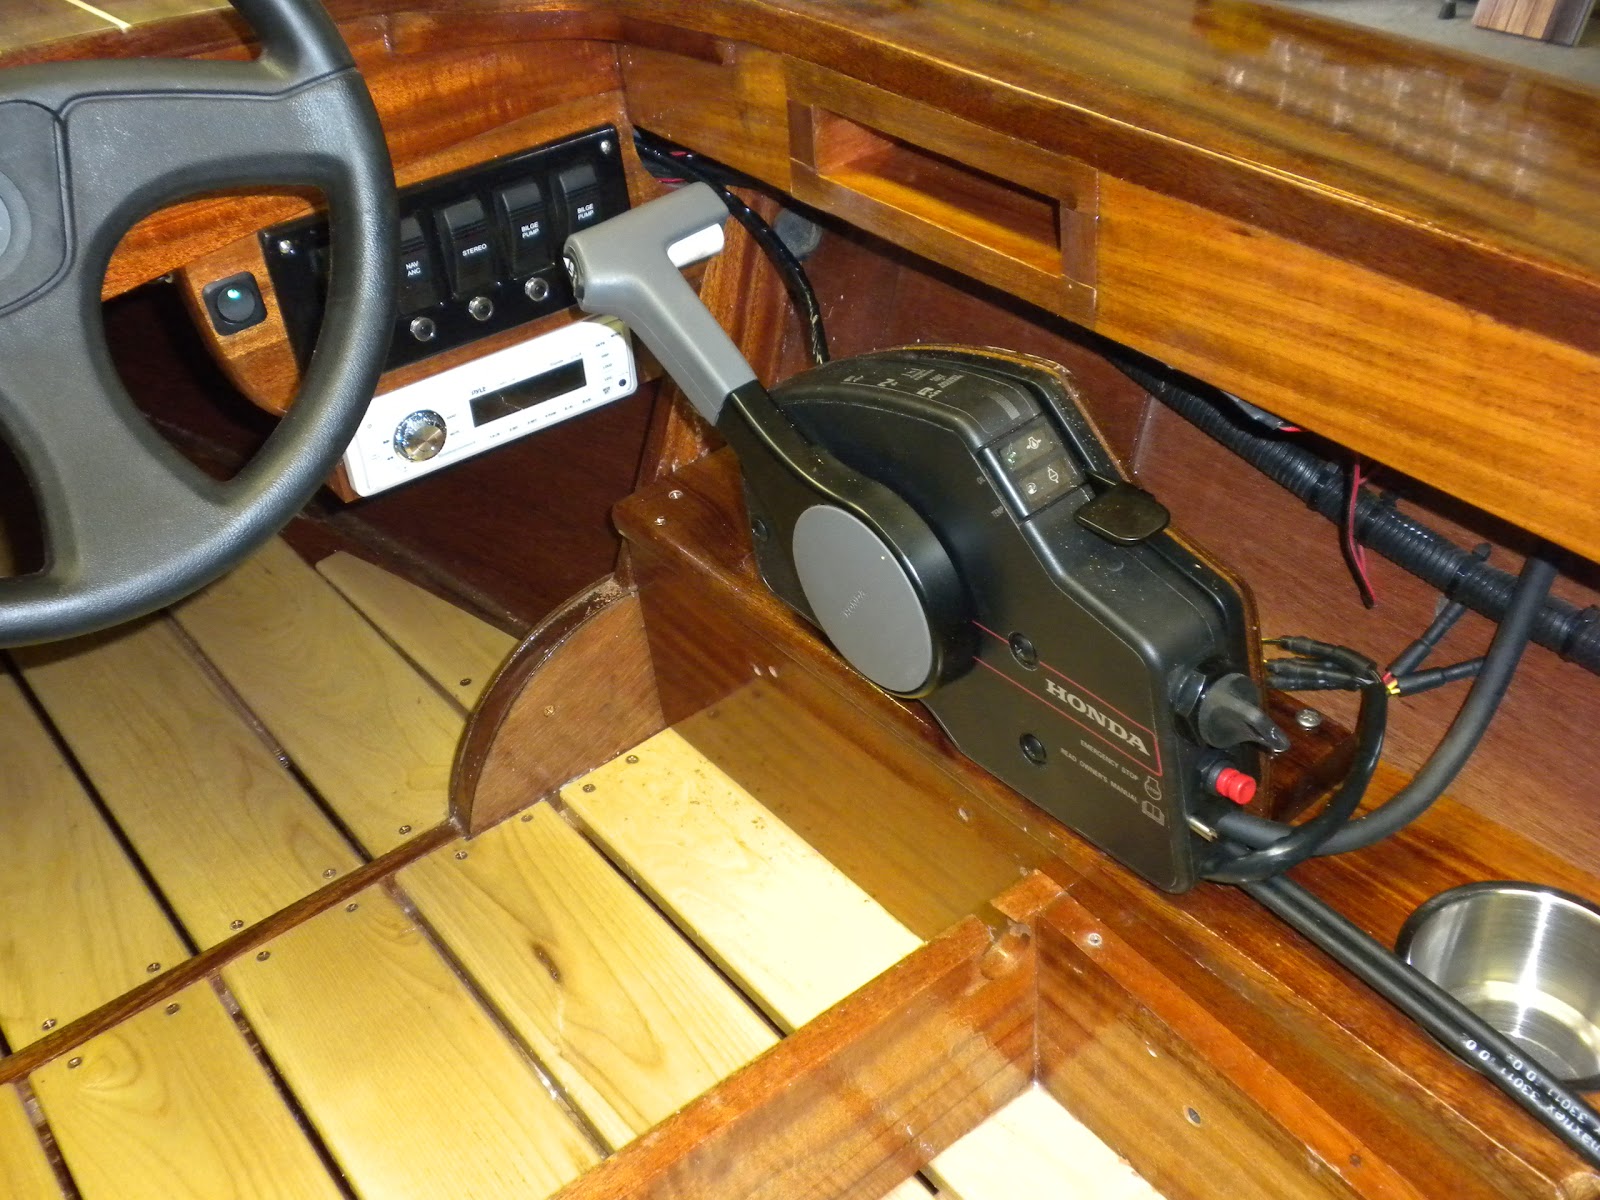
 Glen-L recommends powering the Zip with a short-shaft outboard of up
to 40 hp, and I initially used a 1962 two-stroke 40-hp outboard on mine,
but I didn’t care for the noise or the smell. I later equipped my Zip
with a 1999, 45-hp four-stroke outboard. With the larger and heavier
motor the Zip sits just a little lower at the stern, but when I’m riding
alone or with one passenger and give full throttle to the Zip, it jumps
out right on plane. With four adults aboard the boat does get up on
plane quickly—it just does so a few moments after giving it the gas. I
have had five people in my Zip many times, and I feel very safe in this
boat with it fully loaded. I have no hesitation to go at full speed; I
am just more aware of my weight and balance by always putting the
heaviest passengers in the front. The only issue when it is fully loaded
is that the bow will pitch up a little higher and the boat takes a few
more seconds to get up on plane. The speed and handling characteristics
do not seem to be affected by a full load.
Glen-L recommends powering the Zip with a short-shaft outboard of up
to 40 hp, and I initially used a 1962 two-stroke 40-hp outboard on mine,
but I didn’t care for the noise or the smell. I later equipped my Zip
with a 1999, 45-hp four-stroke outboard. With the larger and heavier
motor the Zip sits just a little lower at the stern, but when I’m riding
alone or with one passenger and give full throttle to the Zip, it jumps
out right on plane. With four adults aboard the boat does get up on
plane quickly—it just does so a few moments after giving it the gas. I
have had five people in my Zip many times, and I feel very safe in this
boat with it fully loaded. I have no hesitation to go at full speed; I
am just more aware of my weight and balance by always putting the
heaviest passengers in the front. The only issue when it is fully loaded
is that the bow will pitch up a little higher and the boat takes a few
more seconds to get up on plane. The speed and handling characteristics
do not seem to be affected by a full load.
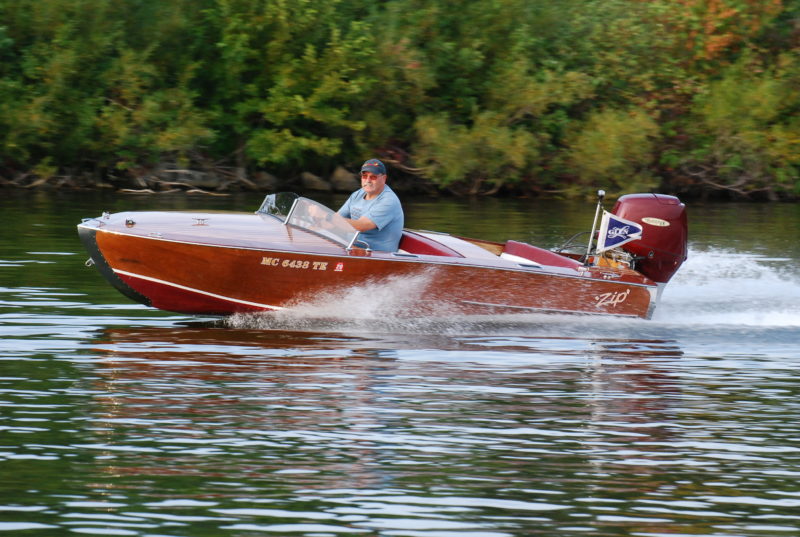
Using a handheld GPS or the GPS app on my cell phone I have recorded a consistent top speed between 32 and 33 mph when I’m driving solo. The boat does well in light chop and begins to porpoise in moderate chop unless I apply full throttle and get up on plane. Once the waves get above 2′, I really need to cut the power back to quarter speed and just plow through the waves rather than subject the boat, and myself, to a lot of heavy pounding.
The boat handles like a dream, and I credit this part of the performance to the skeg; in calm water, I can race along at full throttle and make a sharp turn with little skidding. The Zip has bumper rails to protect the hull below the tumblehome at the stern; they also serve to deflect water away from the aft cockpit, but if there are passengers in the rear seats, I need to warn them they may get some spray in a sharp turn.
 It took me 22 months of working on and off to build the Zip, and I
could not be happier with its performance. I gladly recommend the design
to others. It is a great first boat to build and an exciting boat to
use. It is easy to trailer, and everyone who sees it gives it a
thumbs-up. The design, drawn up in 1954, prompts many people to ask how
old my boat is, and they’re surprised to hear that it hasn’t been around
for decades. It is a great pleasure to own a boat you can proudly say
you built yourself that has both classic design and modern features. If
you’re thinking of getting an outboard boat that will last for years,
that will handle well, that carries up to five people, takes up little
space in the garage, and won’t break the bank to build or operate, you
may want to consider a Glen-L Zip.
It took me 22 months of working on and off to build the Zip, and I
could not be happier with its performance. I gladly recommend the design
to others. It is a great first boat to build and an exciting boat to
use. It is easy to trailer, and everyone who sees it gives it a
thumbs-up. The design, drawn up in 1954, prompts many people to ask how
old my boat is, and they’re surprised to hear that it hasn’t been around
for decades. It is a great pleasure to own a boat you can proudly say
you built yourself that has both classic design and modern features. If
you’re thinking of getting an outboard boat that will last for years,
that will handle well, that carries up to five people, takes up little
space in the garage, and won’t break the bank to build or operate, you
may want to consider a Glen-L Zip.
Ted Gauthier is the Deputy Fire Chief of Bloomfield Village, Michigan. His passion outside of his dream job as a fireman has always been boating and flying. Ted has built himself many things including an airplane, a hot-air balloon, a kayak, and a CNC machine. He grew up with his five brothers by a lake in lower Michigan where he learned to swim, water-ski, and handle boats. He spent almost all his free time as a child saving for gas so he could go out in small boats to enjoy the summer days. He always remembers his first ride in an old wooden boat and has promised himself that one day he will have his own.
Ted documented his progress on the Zip in his blog. He would be happy to help or answer any questions readers may have about building a Glen-L Zip. Emails to Small Boats Monthly will be forwarded to him. His review of a rivet spacing fan appears in this issue.
Beam/5′ 9″
Depth/27″
Weigh/approx. 375 lbs
Plans and patterns for the Zip are available from Glen-L for $108.
I am a Fire Chief in a small community in Michigan, and our Village Manager is my good friend Art Atkinson. One day Art walked into my office and said he was considering building a boat for himself. He had just returned from northern Michigan where old wooden boats are almost everywhere along the shores of Lake Michigan and Lake Huron. I told him I’d been considering building a boat for myself, too. He liked the idea, and we decided we would both build wooden boats while helping each other along the way. I ordered plans for the Zip, and Art settled on an equally classic-looking runabout, the Glen-L Squirt. Both Art and I would be building our boats in our basements and so had limitations on the size of the boats we could build. The 14′ 4″ Zip was the largest boat I could build and still get it out of my walkout basement. The 10’ Squirt was small enough to be carried up the stairs from Art’s basement, and through the kitchen to get it outside.
photographs courtesy of the author
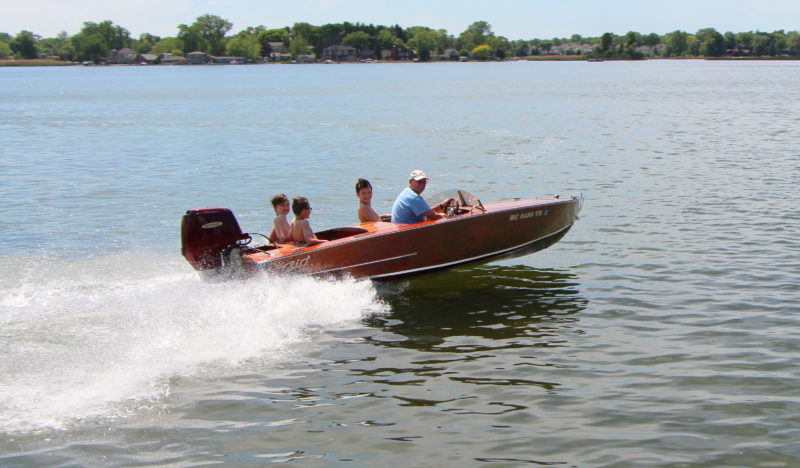
The 5’9″ beam provides the Zip with good stability and the flared sides help keep the occupants dry.
I bought rough-cut African mahogany from a local sawmill, brought it home, and milled it for the frames. The frame pieces are joined by plywood gussets at the corners. The stem is made of two layers of 3/4″ plywood, and the transom is a single thickness of 3/4″ plywood, framed and reinforced with mahogany. Mounted on a dual-beam strongback, the three completed frames, the transom, and the stem define the shape of the hull—there are no temporary forms. The keel, chines, and inwales then connect the transom, frames, and stem. The chines were the most difficult longitudinals to install. Each is a two-piece laminate, and each of those pieces required steaming to coax it into the needed bend and twist. Later it took a lot of clamps to tightly close the glue joints between the chine halvess.
The materials list specifies 1/4″ Douglas-fir exterior plywood for the hull, and while it’s an economical choice, I had a bright-finished boat in mind and so opted to use mahogany marine plywood. For the side panels, I cut two 4×8 sheets of plywood in half and joined the pieces to make a pair of 2×16 sheets, with the seams butted and ’glassed.
With a 45-hp outboard on the transom, the Zip gets on plane quickly.
Work on the interior started after the boat was flipped upright. Floorboards were not included in the plans, but I opted to add them to provide both a more finished look and a stable platform for my passengers to stand on when entering and exiting the boat. I was also worried about feet and gear getting wet, but water never seems to accumulate in the Zip. I used ash for the floorboards because of its strength and for the contrast of color.
The plans call for a deck of mahogany or fir plywood, and while that would be sufficient for a utilitarian boat, many builders of Glen-L runabouts opt to dress the plywood up with covering boards and deck planking. It makes a striking difference. I used mahogany for all of my decking. I bookmatched the broad covering boards to create a symmetrical pattern in the wood grain, then dyed them to create contrast with the deck planks. I added some decking beyond what was detailed in the plans to reduce the open area of the motorwell and provide a tidier appearance. Rather than use white caulk to accent the deck seams, I filled them with epoxy mixed with white pigment. When covered with varnish, the bright white took on a nice, aged golden color.
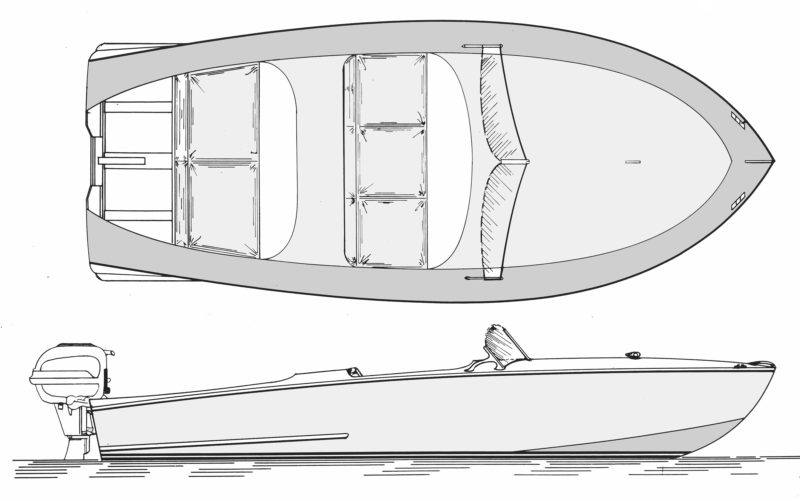
The
plans for the Zip call for a plywood deck, but builders of Glen-L
runabouts often lay deck planking over the plywood for a classic look.
Using a handheld GPS or the GPS app on my cell phone I have recorded a consistent top speed between 32 and 33 mph when I’m driving solo. The boat does well in light chop and begins to porpoise in moderate chop unless I apply full throttle and get up on plane. Once the waves get above 2′, I really need to cut the power back to quarter speed and just plow through the waves rather than subject the boat, and myself, to a lot of heavy pounding.
The boat handles like a dream, and I credit this part of the performance to the skeg; in calm water, I can race along at full throttle and make a sharp turn with little skidding. The Zip has bumper rails to protect the hull below the tumblehome at the stern; they also serve to deflect water away from the aft cockpit, but if there are passengers in the rear seats, I need to warn them they may get some spray in a sharp turn.
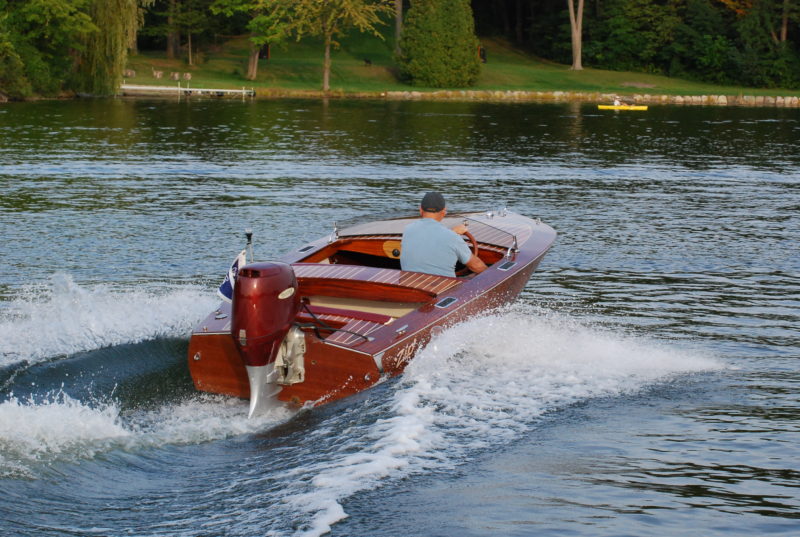
Builder Ted Gauthier has three young passengers aboard here, but has carried four with him in comfort.
Ted Gauthier is the Deputy Fire Chief of Bloomfield Village, Michigan. His passion outside of his dream job as a fireman has always been boating and flying. Ted has built himself many things including an airplane, a hot-air balloon, a kayak, and a CNC machine. He grew up with his five brothers by a lake in lower Michigan where he learned to swim, water-ski, and handle boats. He spent almost all his free time as a child saving for gas so he could go out in small boats to enjoy the summer days. He always remembers his first ride in an old wooden boat and has promised himself that one day he will have his own.
Ted documented his progress on the Zip in his blog. He would be happy to help or answer any questions readers may have about building a Glen-L Zip. Emails to Small Boats Monthly will be forwarded to him. His review of a rivet spacing fan appears in this issue.
Zip Particulars
Length/14′ 4″Beam/5′ 9″
Depth/27″
Weigh/approx. 375 lbs
Plans and patterns for the Zip are available from Glen-L for $108.